Pages

Tuesday, 17 December 2013

Liferay Environment Challenges with Eclipse

  • ECJ is not installed Error when deploy the portlet from eclipse
  • PermGen Space Error / Out of Memory Error

ECJ is not installed Error when deploy portlet in eclipse

Solution: 1

Generally in liferay to compile and build the application it uses ECJ jar. When we use following properties in build.properits file of Liferay Plugins SDK

#javac.compiler=modern
   javac.compiler=org.eclipse.jdt.core.JDTCompilerAdapter
When we use JDT compiler in eclipse then It will expect ecj.jar should be available in global ant runtime path.

So we need to add ecj.jar file to ANT global class path as follows

Go to eclipse windows preferences


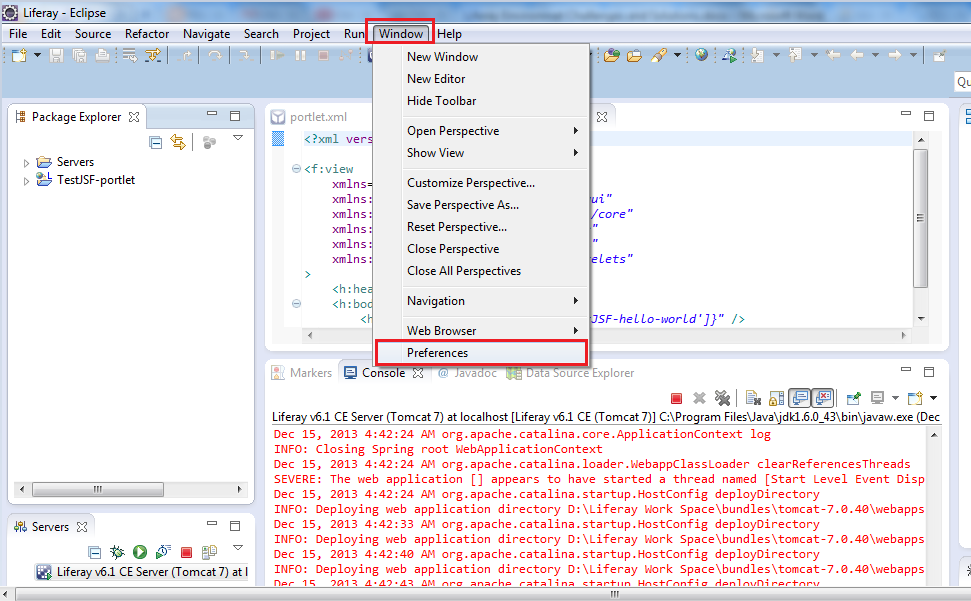
Select ANT run time as follows


Now add jar file to ant global class path. Select external jar file button then brows ecj.jar file

Note:

ecj.jar file available in Plugins SDK lib directory (liferay-plugins-sdk-6.2.0/lib)

Solution: 2

Now we can also skip this error by using java compiler to modern.

We already know we have created SystemUserName.build.properties to override properties in Plugins SDK build.properties file.

We just uncomment JDT compiler and enable java complier to modern in SystemUserName.build.propertis file of your Plugins SDK.

Do as follows in properties file

    javac.compiler=modern
   #javac.compiler=org.eclipse.jdt.core.JDTCompilerAdapter
PermGen Space Error / Out of Memory Error

When we run liferay we need to set heap memory for JVM that is used by liferay application server

The following three options witch control the JVM Heap memory so that we need to set this values as JAVA_OPTS.

-Xms
-Xmx
-XX:MaxPermSize
Set this following values as JAVA_OPTS so that liferay portal can run without PermGen space error or Out of Memory Error

-Xms1024m -Xmx1024m -XX:MaxPermSize=256m
We can set JAVA_OPTS in following ways

  1. Set JAVA_OPTS as System Variable
  2. Set JAVA_OPTS in Application Server
  3. Set JAVA_OPTS to Eclipse Configured Server


Set JAVA_OPTS as System Variable in Windows

When we set JAVA_OPTS as System Environment Variable then all servers uses the same java opts to all servers and applications which are running in the machine

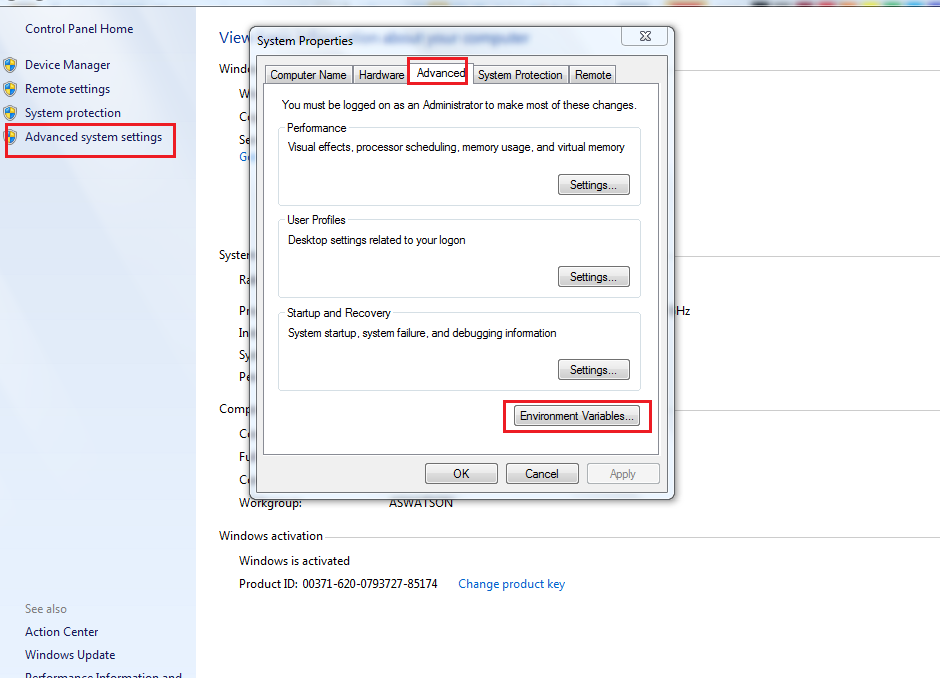
To set JAVA_OPTS in windows operating system we need to go to computer properties and need to choose Advanced System Settings

The following screen shows to select computer properties


Now click on Environment variables
The following screen shows advances system settings

In the system variables section click on new button to create new system environment variables

The following screen shows create system environment variables

Once click on new it will ask variable name and its value and click on OK then JAVA_OPTS will be created as System Environment Variables.

Enter following values

Variable Name:  JAVA_OPTS
Variable Value:  -Xms1024m -Xmx1024m -XX:MaxPermSize=256m
Note:

When we set JAVA_OPTS as system variables then all application servers which are running in the machine will use these values.

This variable not only for Liferay portal it can be for any web applications which are running in the server.

This variables setting in windows environment and its same for other OS like Linux but setting of variable is bit different.
Set JAVA_OPTS in Application Server

We can also set JAVA_OPTS values in application serves. For each server there some configuration files we can set server configuration in the file so that it can be read by when server is starting.

When we set the value in server then it can be used by application which is running in the server.
Server configuration file is different with respect to server vendor.

Tomcat Server:

In tomcat we will use setenv.bat/setenv.sh file to configure JAVA_OPTS
Go to tomcat server bin directory and create setenv.bat file for windows environment and setenv.sh for Linux environment.

Once we create the files add JAVA_OPTS in file as follows
In windows setenv.bat as follows

set "JAVA_OPTS=%JAVA_OPTS% -Xmx1024m -XX:MaxPermSize=256m"
In Linux setenv.sh as follows

export JAVA_OPTS="$JAVA_OPTS -Xmx1024m -XX:MaxPermSize=256m"
In tomcat server we can also use CATALINA_OPTS instead of JAVA_OPTS. This is only for tomcat server

In windows setenv.bat as follows

set " CATALINA_OPTS =% CATALINA_OPTS % -Xmx1024m -XX:MaxPermSize=256m"
In Linux setenv.sh as follows

export CATALINA_OPTS ="$ CATALINA_OPTS -Xmx1024m -XX:MaxPermSize=256m"
Note:

In liferay tomcat server setenv.bat/setenv.sh and configuration already have done. If any problem occurred we just need adjust the values in configuration.

This configuration not only for liferay environment we can use for any web applications which are in running in server.

JBOSS Server

Jboss in windows

Jboss server in windows OS we will use standalone.conf.bat this file available in jboss server bin directory (jboss-7.1.1\bin).


Open jboss standalone.conf.bat and set JAVA_OPTS as follows

set "JAVA_OPTS=%JAVA_OPTS% -Dfile.encoding=UTF-8 -Djava.net.preferIPv4Stack=true -Duser.timezone=GMT -Xmx1024m -XX:MaxPermSize=256m"
Jboss in Linux

Jboss server in Linux we will use standalone.conf this file available in jboss server bin directory(jboss-7.1.1\bin).


Open jboss standalone.conf and set JAVA_OPTS as follows

JAVA_OPTS="$JAVA_OPTS -Dfile.encoding=UTF-8 -Djava.net.preferIPv4Stack=true -Duser.timezone=GMT -Xmx1024m -XX:MaxPermSize=256m"
Note:

In liferay jboss bundle all configurations already done and when we get any problems then we just need to adjust values.

These configuration can use for any web application not only for liferay.


Set JAVA_OPTS to Eclipse Configured Server

Generally we configure application servers to eclipse. We can also configure the values through eclipse.

In ellipse go to servers view and double click on server and then click open launch configuration


Once opened configuration winnow select arguments tab and see the VM arguments
Now you can see memory related variables and you can adjust the size of variables

Friday, 16 August 2013

Creating a FreeMarker template theme

Creating a FreeMarker template theme

The default templates are Velocity templates in the Liferay themes. This can be verified by looking at the following highlighted line in the ${PLUGINS_SDK_HOME}/themes/build-common-theme.xml file:
<if> <not> <isset property="theme.type" /> </not> <then> <property name="theme.type" value="vm" /> </then> </if>
Liferay engineers can now create a theme with FreeMarker templates in Liferay portal. To create aFreeMarker theme, we need to update the theme type to FreeMarker. This can be done by following the procedure given next:
  1. In the ${liferay.plugins.sdk.home}/themes/ folder, run the following command:
    create.bat|./create.sh] freemarker "FreeMarker Theme"
  2. Add a theme.type line in the ${PLUGINS_SDK_HOME}/themes/freemarker-theme/build.xml file as shown next:
  3. <property name="theme.type" value="ftl"></property> <property name="theme.parent" value="classic"></property>
  4. Copy the css, images, js, and templates folders from the${PORTAL_ROOT_HOME}/html/themes/classic/ directory to the${PLUGINS_SDK_HOME}/themes/freemarker-theme/docroot/_diffs/ folder.
  5. Ant-deploy the FreeMarker theme to a running Liferay environment. The freemarker-theme-{version.number}.war file will be deployed.
  6. Copy the ${PORTAL_ROOT_HOME}/webapps/freemarker-theme/WEB-INF/liferay-look-and-feel.xml file to the ${PLUGINS_SDK_HOME}/themes/freemarker-theme/docroot/WEB-INF/ folder.
  7. Update the ${PLUGINS_SDK_HOME}/freemarker-theme/docroot/WEB-INF/liferay-look-and-feel.xml file as follows:
    <look-and-feel> <compatibility> <version>6.0.5+</version> </compatibility> <theme id="freemarker" name="FreeMarker"> <template-extension>ftl</template-extension> </theme> </look-and-feel>
  8. Ant-deploy the FreeMarker theme again.
Now you have a Liferay theme that uses FreeMarker templates. Right now, it looks the same as the original Liferay Classic theme that uses Velocity templates.
What are the theme variables available in the FreeMarker templates? Just like the Velocity templates, you have all the theme variables necessary for creation of a theme in the FreeMarker templates. These variables are defined in the com.liferay.portal.freemarker.FreeMarkerVariables.java file and the${PORTAL_ROOT_HOME}/html/themes/_unstyled/init.ftl file. Here are some examples:
  • htmlUtil
  • languageUtil
  • themeDisplay
  • company
  • user
  • layout
  • scopeGroupId
  • permissionChecker
  • colorScheme
  • user_id
  • is_default_user
  • language
  • show_control_panel
  • bottom_include
  • date
  • the_year

Theme coding conventions

One of the best practices in Liferay theme engineering is to follow some coding conventions in the theme development. You can save time, avoid pitfalls, and make your code consistent by following these standards and conventions.

Cascading style sheet conventions

The following snippet of CSS code is taken from the${PORTAL_ROOT_HOME}/html/themes/_styled/css/application.css file.
/* ---------- Menus ---------- */ .lfr-actions.portlet-options .lfr-trigger strong span, .visible. portlet-options .lfr-trigger strong span { background-image: url(../images/portlet/options.png); }
You can see that the Liferay developers observe the following rules in CSS coding:
  • Use a comment line to group-related selectors
  • Put one blank line between the selectors and the comment
  • Separate multiple selectors with a comma and a newline
  • Leave one space between the selector name and the starting "{"
  • Indent the declarations with one tab
  • Put a space between the property name and its value in the declaration
  • Leave no space between the URL and the opening "(" for a background image property
  • Use a relative URL path instead of an absolute one

Image folder and file conventions

Liferay uses a lot of images as part of themes. These images files are collectively put in, say, the${PORTAL_ROOT_HOME}/html/themes/classic/images/ directory for the Classic theme. Within this directory, the image files are further grouped in different subfolders. Here are some examples:
  • add_content: Images files for the Add Application functionality
  • application: Commonly used image files for all applications
  • arrows: All shapes of arrow images
  • aui: Image files used by the newly developed Alloy UI library
  • blogs: Image files used by the blog portlet and web content portlet
Only alphabetical characters (in lowercase) and underscores are allowed in the image folder names and filenames, such as the following:
  • color_schemes
  • dockbar
  • image_gallery/slide_show.png
  • trees/root.png

JavaScript coding conventions

Liferay has a minifier filter that is used to remove empty lines and extra spaces in the page markup file before the application server sends it to a browser. The purpose of this minifier filter is to reduce the bytes to be sent and thus improve network speed.
In some Liferay versions this minifier filter removes the comments in the JavaScript functions, while in other versions it does not. This has impact on the way we code in JavaScript. Here is an example.
function showMessage() { // comment alert("Hello World!"); }
This function will work without the minifier filter. When the minifier filter is working, it removes the extra spaces. The function becomes as follows:
function showMessage(){// comment alert("Hello World!");}
Now the browser will complain that the showMessage function is not defined. The lesson here is that we should always use multiline comment signs in JavaScript coding, as seen in the following snippet of code:
function showMessage() { /* comment */ alert("Hello World!"); }
In this case, even if the function is minified, it will still work. This is also true for the functions defined in separate JavaScript files.
The following code works fine without the minifier filter:
function <portlet:namespace />validateprofile(frm) { var re = /^[a-zA-Z\.-\s]+$/; if(!re.test(frm.<portlet:namespace />firstName.value)) { alert("First name contains invalid characters!"); return false; } // ignore details }
After the minifier filter is applied, the previous code becomes as follows:
function <portlet:namespace />validateprofile(frm){ var re = /^ [a-zA-Z\.-\s]+$/; if(!re.test(frm.<portlet:namespace /> firstName.value)) {... } ... }
The browser will complain about an invalid character set (in the regular expression). It will say that thevalidateprofile function is not defined. To fix this, we need to use the RegExp object:
function <portlet:namespace />validateprofile(frm) { var re = new RegExp('^[a-zA-Z- \.]+$'); if(!re.test(frm.<portlet:namespace />firstName.value)) { alert("First name contains invalid characters!"); return false; } }
It is also advisable to use a good tool for JavaScript code debugging.

Brower compatibility

Many CSS styles are displayed differently in different browsers. This is because while major modern browsers support CSS according to the World Wide Web Consortium (W3C) specifications, they implement some CSS rules in different ways.
In order for a custom theme to look the same in different browsers, we need to pay attention to three aspects in our theme composing—specifying a DOCTYPE, using CSS reset styles, and limited support of CSS3 in the Internet Explorer 6, 7, and 8.

Specifying a DOCTYPE

Modern browsers have two rendering modes—standards mode and quirks mode. In quirks mode, a browser renders pages written for older browsers. The quirks mode is for backward compatibility. Instandards mode, a browser works according to the W3C specifications as closely as possible. The standards mode complies with W3C standards.
In theme coding, we use the DOCTYPE tag to tell a browser that a theme follows standards. After this theme is applied to a page, the browser will render this page according to W3C specifications. One example of the DOCTYPE tag is as follows:
<!DOCTYPE html PUBLIC "-//W3C//DTD XHTML 1.0 Transitional//EN" "http://www.w3.org/TR/xhtml1/DTD/xhtml1-transitional.dtd">
This markup is used in the Classic theme in Liferay Portal 5.x. This XHTML 1.0 Transitional DOCTYPE will tell a browser to switch to standards mode for rendering this page.
The DOCTYPE should be the first tag in the document.
In the portal_normal.vm file for the Classic theme in Liferay Portal 6, you will find the HTML5 DOCTYPE as follows:
<!DOCTYPE html>

Using CSS reset styles

A page may still look different in two different browsers even when both the browsers are rendering the page in standards mode. For example, the &ltul> tag gets padding in Firefox but a margin in Internet Explorer. To make the &ltul> tag look the same in both Firefox and Internet Explorer, we use the following CSS reset style:
* { padding: 0; margin: 0; }
The * is a universal selector. This style resets the padding and margins on all the elements to zero. Now it does not matter whether the &ltul> tag has padding or a margin because both the attributes have the same value—zero. The &ltul> tag will look the same in both, Firefox and Internet Explorer.
You will find such styles in a base.css file of a Liferay theme. The following is a snippet of code from that file:
/* ---------- Browser normalization ---------- */ body, div, dl, dt, dd, ul, ol, li, h1, h2, h3, h4, h5, h6, pre, form, fieldset, input, textarea, p, blockquote, th, td { margin: 0; padding: 0; }
This solution is called browser normalization in Liferay.

Limited support of CSS3 in Internet Explorer 6, 7, and 8

One of the nice features in CSS3 is to use the border-radius property, as seen in the code snippet that follows, in order to create rounded corners with CSS3 easily, without the need for corner images or the use of multiple &ltdiv> tags. This is perhaps one of the most talked about aspects of CSS3.
-moz-border-radius: 15px;
This property is supported well in Firefox, Safari, Google Chrome, and IE 9 browsers. The following screenshot, which was taken in Firefox 3.6, shows how the tabs are displayed with rounded corners without using corner images:
IE 6, 7, and 8 do not sufficiently support CSS3. Particularly, the previous property is not supported. Therefore, the same tabs controlled by the same CSS3 code appear differently (with straight corners) in IE 6, 7 and 8. Refer to the following screenshot taken in IE 7:

Dealing with browser bugs

When the previous measures still do not work or you have to deal with a browser bug, you can add browser prefix to a style to target a specific browser issue.
The following code is from the custom.css file of the Liferay Classic theme:
.ie6 #wrapper { width: 90%; }
This style is for Internet Explorer 6 only. For a &ltdiv> block whose ID is wrapper, its width is specified as relatively 90%.

Development tools

As you can see from the portal_normal.vm file, the rendering of a theme is the rendering of a whole web page. Any tool suitable for web application development may be usable for theme development. Especially you may use the following tools in writing a theme.

Liferay IDE in Eclipse

Eclipse is a multi-language software development environment comprising an Integrated Development Environment (IDE) and an extensible plugin system. It is written primarily in Java (and can be used to develop applications in Java) and also, by the means of various plugins, other languages.
Liferay IDE is an extension for the Eclipse platform that supports development of plugin projects for the Liferay portal platform. It is available as a set of Eclipse plugins, installable from an update site. The latest version supports five types of Liferay plugins—portlets, hooks, layout templates, themes, and EXT-style plugin. Liferay IDE requires the Eclipse Java EE developer package of versions Galileo or Helios. For more details, please visit the Liferay IDE wiki page at http://www.liferay.com/community/wiki/-/wiki/Main/Liferay+IDE. There are multiple wiki pages available for helping to set up the IDE and create theme plugin in the IDE.
Both Liferay Portal and Liferay Plugins SDK can be integrated in this Liferay IDE running on Eclipse platform. You can include the runtime environment and set up debugging tools among other features, as you are able to do for other J2EE and web projects in Eclipse. You can also download and install Quantum DB and Subversion plugins so that you can connect to Liferay database and check in/out code with Subversion. This IDE can significantly improve your Liferay engineering efficiency.
The following screenshot shows that you can create a Liferay Plugin project in Liferay IDE:
After the theme plugin is created in the Liferay IDE, you can add all the necessary files, including CSS, images, JavaScript, and Velocity templates to your theme folders. Any code changes, whenever saved, will trigger the build process and the modified theme will be deployed in the runtime environment for verification.
The following screenshot shows a theme plugin project in Liferay IDE: